Markdown In, HTML Out: A Crash Course
Write in Markdown. Read in HTML. The two document languages of working with agents.
Most people type a vague request into an AI and get a long wall of text back. The request was vague, so the AI had to guess what they meant. The answer is too long to read, so they skim it. Something is lost in both directions: the AI never really understood them, and they never really read its answer.
This course fixes both directions, with one language for each. Both names may be new to you. Markdown is plain text with a few extra marks that show structure: a # before a heading, a - before each item in a list. You have already seen it without knowing its name: when Claude or ChatGPT makes a word bold or gives you a bullet list, it is writing Markdown. You type it straight into the same chat box you already use; there is nothing to install. HTML is the language web pages are built from: every page you have ever opened in a browser, including this one, is HTML underneath. Neither is programming. Both are ordinary text. The skill is knowing which one to use in which direction.
Power users split the conversation by direction. They write to the AI in Markdown (headings, lists, code blocks), because structure leaves it nothing to guess about. And they ask the AI to answer in HTML (diagrams, tables, color, interactivity), because a designed page is the only long answer a busy human actually reads. The first language takes an hour to learn. The second one you never write at all; you only learn to demand it. (One word before we go on: this book says agent for an AI that does multi-step work on your behalf. Today that is just Claude in a browser tab. Later in the book it gets a terminal and your files. The format rules you learn here are the same either way.)
The whole course
, in one picture:
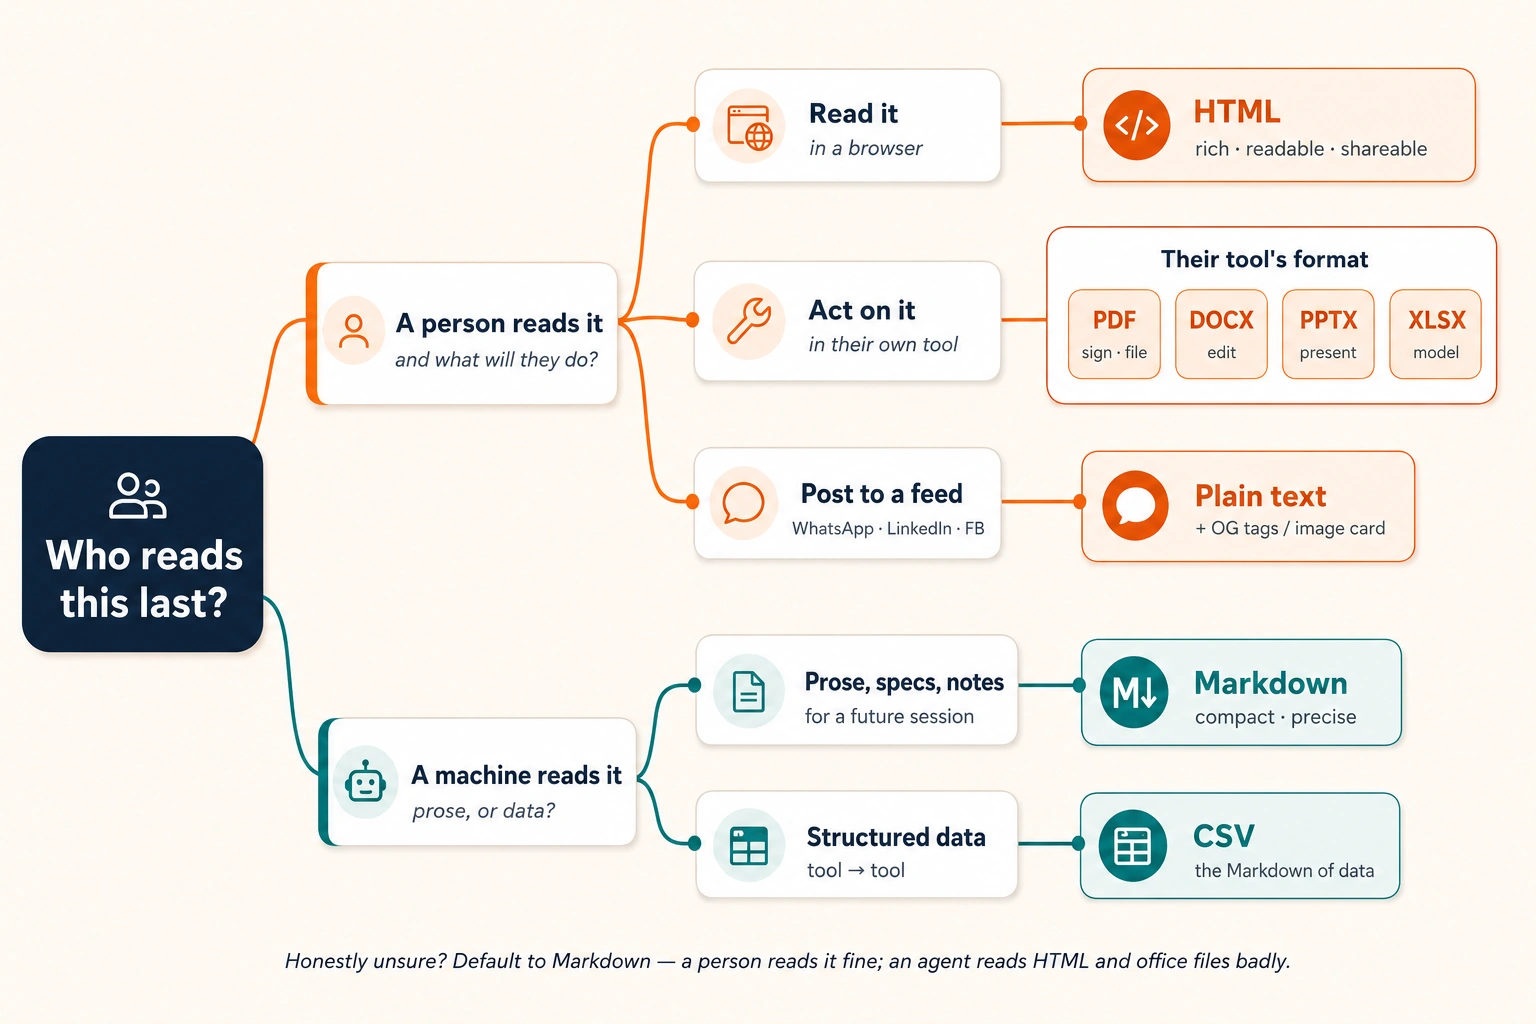
Behind the picture sits one question, and it settles every format decision in this course: who reads this last? If a person will read it in a browser, ask for HTML. If an AI will read it, or you will feed it back to an AI later, keep it in Markdown. If it is going into a social feed, plain text. "Markdown in, HTML out" is just the most common pair of answers. Hold the question; the rest of this page is the details.
Prove it in two minutes
Before any theory, run the whole course once. Open Claude.ai (a free account takes a minute; ChatGPT or Gemini work too) and paste:
Make me a small web page as an HTML artifact: a welcome card for a
neighborhood tuition center. A colorful holiday-notice banner on top,
three example courses with monthly fees in a neat table, and a
WhatsApp contact button. Keep it readable on a phone.
Claude thinks for a moment, then opens a panel beside the chat and builds a real, styled page in it: banner, table, button. That panel is an artifact : a live document the AI builds next to the conversation instead of inside it. (ChatGPT and Gemini call theirs Canvas ; same idea.) If you got a wall of code instead of a rendered page, say show it to me as a rendered artifact and it will flip. Now find the share or publish control on the artifact panel, tap it, and open the resulting link on your phone.
Two minutes, and you have already done everything this course teaches, once, by accident: a few structured lines went in, a designed page came out, and a link made it shareable. The fourteen concepts below make each of those steps deliberate, so they keep working when the stakes are higher than a demo. Part 1 frames the split. Part 2 teaches the handful of Markdown you write by hand. Part 3 teaches you to demand, judge, and publish HTML you never write. Part 4 runs one exercise across the three ways you will meet agents in this book. By the end you will be able to write a clean Markdown spec, turn it into a readable HTML artifact someone else can open from a link, and decide for any given output whether it should be Markdown, HTML, or plain text for a feed.
📚 Teaching Aid
Open Full Slideshow
View Full Presentation — Markdown In, HTML Out
This crash course assumes the Foundations before it: What AI Actually Is for the mental model of the machine, and AI Prompting in 2026 for the habits. Those habits (load the right context, brainstorm then iterate, grade the output out of 10) all reappear here; this course gives them a file format to live in. The deeper tool walkthroughs live in the Agentic Coding Crash Course and the Cowork & OpenWork Crash Course ; you need neither to finish this page.
What you need
One free chat account. Claude.ai is what the examples use; ChatGPT or Gemini run every chat prompt here unchanged. Where a prompt says "artifact," say "Canvas" on those two; on any other tool, ask for "a single HTML file" and it works the same.
Web access turned on in the tool, so the AI can fetch the links you include. In most tools it is on by default; if a link example does not work, check the web search setting.
A phone , to judge what you make the way your readers will actually see it.
Reading takes about an hour; the seven closing prompts add about thirty minutes. Run the prompts as you go: reading gives you the vocabulary, running them gives you the skill.
Part 1: The two languages
1. Why agents need structure
Here is the same request, written twice.
Unstructured:
I want a page for my tuition center, it should look professional
and have our courses and timings and a way for parents to contact
us, also fees, and it should work on phones since most parents
use phones, oh and put the Eid holiday notice somewhere visible.
Structured:
Tuition Center Landing Page Specification
Goal
A single-page site parents visit from their phones to check
courses, timings, fees, and contact info.
Requirements
-
Mobile-first layout (most visitors are on phones)
-
Course list with timings and monthly fees
-
Contact section: phone, WhatsApp link, location
-
Holiday notice banner at the top (currently: Eid holidays,
center closed June 6-9)
Out of scope
-
Online payments
-
Student login
Both contain the same information. But the first forces the agent to infer the structure: is the holiday notice more important than the fees? Is "professional" a constraint or a vibe? Is "a way to contact us" a form or a phone number? Every inference is a place the agent can guess wrong, and an agent that guesses wrong does not look wrong. It looks confident.
The second version makes the structure explicit. Headings declare what kind of information each block is. Bullets declare that the requirements are a set , each one independently checkable. And the "Out of scope" section does something prose almost never does: it states what you do not want, which is half of every good specification.
This is why Markdown is the specification language of agentic work. Agents are trained on enormous amounts of Markdown (most of the documentation on the internet is written in it), so they parse its structure natively: a # heading is not decoration to them, it is a signal about hierarchy and importance. (Later chapters call the place these written-down intentions live the Intent Layer : human intent, written precisely enough for an agent to act on. You are learning to write it now.)
A non-software example. A school administrator asked an agent to "draft the annual sports day plan, the usual events, and make sure the younger kids aren't in the afternoon heat." The draft scheduled the under-8 races at 2 p.m. anyway: the constraint was buried mid-sentence in prose, and the agent weighted it as a preference. She rewrote the request with a ## Hard constraints heading containing one bullet: "All under-8 events must finish before 11 :30 a.m." The next draft complied perfectly. The constraint did not change. Its visibility in the structure changed.
The habit, stated once: anything an agent must not get wrong belongs under its own heading or in its own bullet, never inside a sentence.
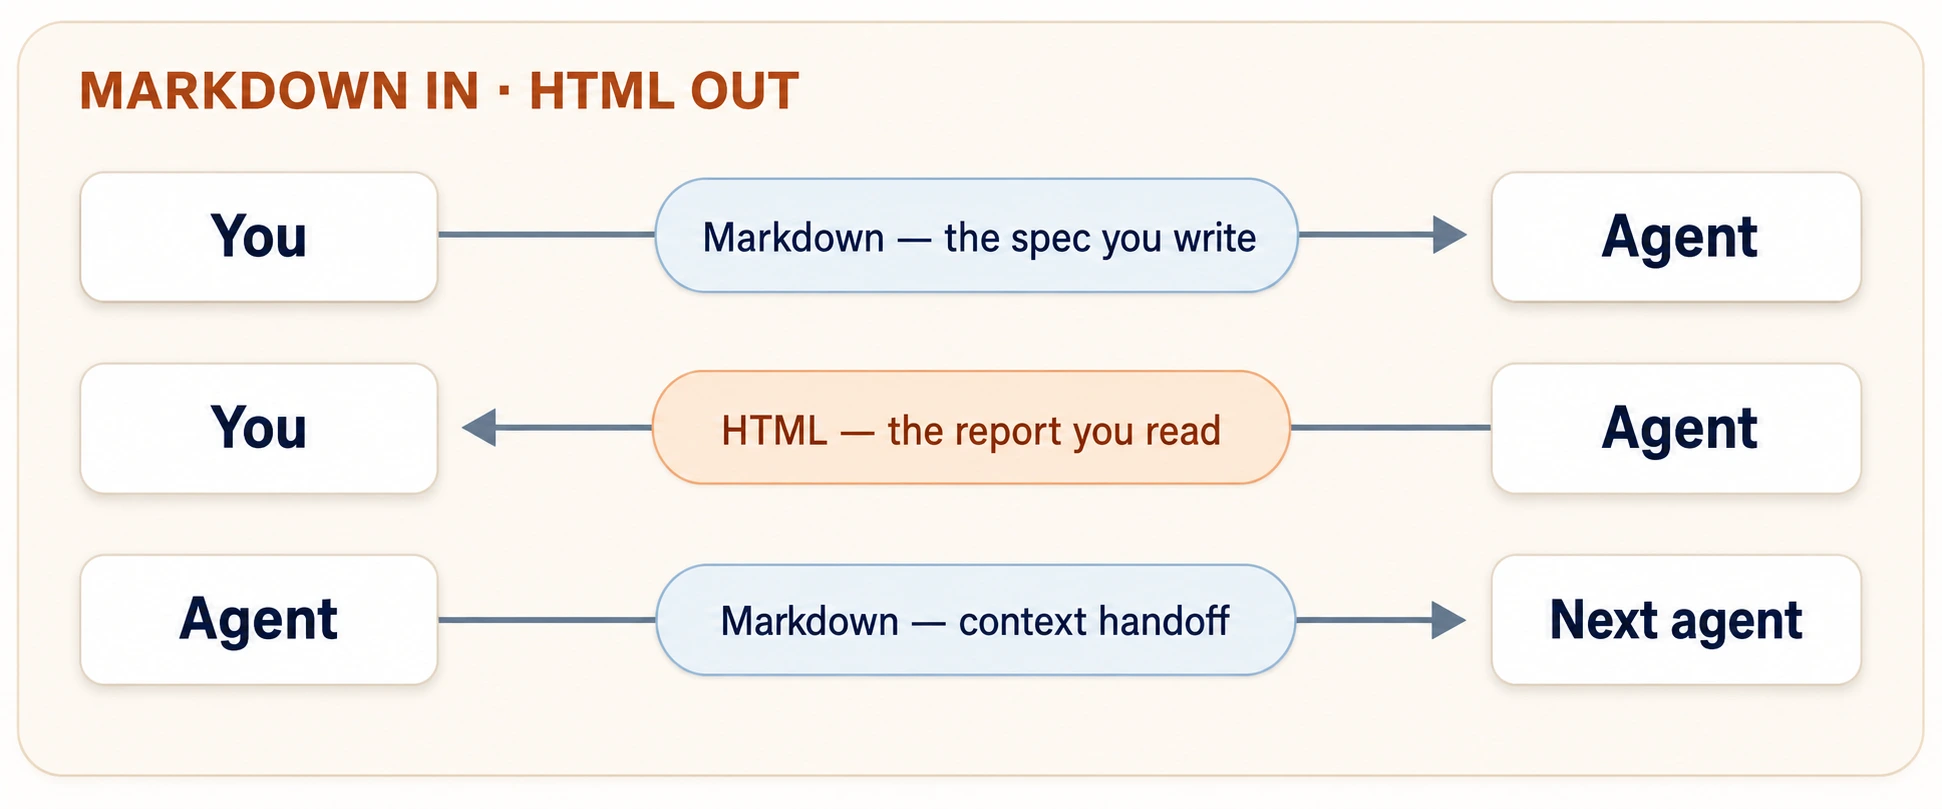
2. The asymmetry: Markdown in, HTML out
So Markdown is the input language. Is it the output language too? Until recently, yes: agents answer in Markdown by default, and for short answers that is fine.
But if your mental picture of AI output is walls of bulleted text, that picture is now out of date. In a widely-circulated essay, Thariq Shihipar of Anthropic's Claude Code team described why he and others on the team stopped asking for Markdown outputs and started asking for HTML. His reasoning, paraphrased:
Long Markdown is unreadable. Past about a hundred lines, humans stop reading Markdown files, and as agents take on bigger tasks, their plans and reports keep getting longer. The hundred is not a magic number; the honest test is whether you would read the thing top to bottom, and at some length the answer becomes no. An unread plan is a plan you did not actually approve.
Markdown's ceiling is low. Headings, lists, tables, and not much else. When an agent needs to show you a workflow, a color palette, or a layout, Markdown resorts to ASCII art: charming, but a workaround.
HTML has almost no ceiling. Styled tables, diagrams, annotated code, interactive controls. There is very little an agent can know that HTML cannot show a human efficiently.
HTML is shareable. Browsers render it natively. A colleague clicks a link; nobody installs anything. People actually read a designed page; they politely ignore a raw text file.
Markdown's killer feature is fading. Markdown was great because humans could easily hand-edit it. But increasingly you do not hand-edit agent output; you prompt the agent to edit it. Once the agent does the editing, the format only has to suit the reader.
The result is a clean asymmetry, and it is the spine of this entire course:
Direction Format Why You → agent Markdown Structure removes ambiguity. Fast to type. Agents parse it natively. Agent → you HTML Rich, readable, shareable, interactive. A 500-line plan you will actually read. Agent → agent Markdown Specs, notes, and context passed between AI sessions stay compact and precise.
You write the first row by hand, which is why Part 2 teaches it properly. You never write the second row; you prompt for it, which is why Part 3 teaches the prompts instead of the tags.
"HTML out" has one condition: the reader is human
Every advantage HTML has is an advantage for eyes and browsers. To an AI, the same file is noise around the meaning: tags, styling, and layout code spending thousands of words to say what Markdown says in fifty. So anything kept for an AI stays Markdown. That includes more than you might think: a new chat remembers nothing, so the notes you save today and paste into tomorrow's conversation are "agent → agent" too, even though both agents are talking to you. Ask the one question: who reads this last?
A person reads it last → HTML .
An AI reads it last (including a future chat) → Markdown .
Honestly unsure → Markdown . A person can read Markdown well enough; an AI reads HTML badly. And you can always render Markdown into HTML at the moment a person needs it.
Where you have already seen this asymmetry
Every chapter of this book is written in Markdown (the source files end in .md ), and the diagrams you see are mostly SVG, which is HTML's illustration language. The book practices the asymmetry it preaches: Markdown where precision matters, rich visuals where human reading matters.
Part 2: Markdown, the writing language
Markdown has dozens of features. You need five. The five below cover essentially every specification, brief, and context file you will write in this book, and the closing concept of this part assembles them into your first complete spec.
How to practice: every example in this part is a prompt you can paste into Claude.ai right now. The structure you type is the lesson.
3. Headings: tell the AI what matters most
A # makes a heading. More # symbols make deeper levels:
Document title (one per document)
Major section
Subsection
That is the entire syntax. What matters is what headings do for the AI: they show which information is most important and which details belong under which section. Everything under ## Hard constraints is a constraint the AI must follow. Everything under ## Nice to have is optional. Without headings, the AI has to guess what matters. With headings, you tell it directly.
Three rules that prevent 90% of heading mistakes:
Rule Why it matters to an agent One # title per document Two titles means two documents fused together; the agent may treat them as separate tasks. Never skip levels ( # → ### ) A skipped level breaks the tree; the agent can misattach a subsection to the wrong parent. Make headings claims , not labels ## Budget says less than ## Budget: PKR 50,000 hard ceiling . The heading itself carries the constraint.
Try it now. Paste this into Claude.ai:
Here are my notes for a family Eid dinner, as one messy paragraph:
"around 20 guests, three are vegetarian, budget about 25k rupees,
my mother handles the biryani so don't plan a main rice dish,
need a kids' table, dinner at 8pm, we are renting 4 extra chairs."
Restructure these notes as a Markdown document with headings for
Goal, Hard constraints, Already handled, and Open questions.
Put each fact under the right heading. If a fact could belong to
two headings, choose one and tell me why.
Read what comes back. The agent will make a judgment call or two (is "dinner at 8pm" a constraint or a goal?), and seeing it explain the call teaches you how agents read your structure.
4. Lists: bullets for sets, numbers for sequences
Two list types, one distinction that agents take seriously:
Features the page must have: Steps to publish:
-
Course list with fees 1. Review the draft
-
WhatsApp contact button 2. Fix the timings table
-
Holiday banner 3. Publish
-
Urdu/English toggle 4. Send the link to parents
Bullets ( - ) say: these items are a set; order does not matter; each is independently true. Use them for features, requirements, constraints, options.
Numbers ( 1. ) say: these items are a sequence; order is the point; step 3 assumes step 2 happened. Use them for procedures, workflows, anything where doing it backwards breaks it.
This sounds cosmetic. It is not. Give an agent a numbered list and it treats the order as part of the instruction; it will almost never start step 4 before step 1. Give it bullets and it feels free to address items in whatever order is efficient. Choosing the wrong list type sends the wrong signal about your intent.
Nesting adds one more dimension: sub-items belong to their parent.
-
Contact section
-
Phone number (clickable on mobile)
-
WhatsApp link (tapping it opens a chat)
-
Map pin, not a full embedded map
The checkable-bullet habit. The best requirement bullets are ones a reviewer could mark ✅ or ❌ without discussion. "Page should be fast" is not checkable. "Page loads in under 3 seconds on a 3G connection" is. When you write a spec, reread each bullet and ask: could the agent, or I, verify this one objectively? This is the grade-out-of-10 discipline from AI Prompting in 2026 , applied one bullet at a time.
5. Code blocks: showing the AI exactly what you mean
Sometimes you need to include a piece of text in your prompt that the AI should look at but not act on : an error message, an example of the output format you want, or a quote from someone else. Wrapping it in triple backticks ( ``` ) tells the AI: "this is data, not an instruction." (The backtick ` lives above the Tab key on most laptop keyboards; on a phone keyboard, long-press the apostrophe.)
pythondef greet(name): return f"Assalam-o-Alaikum, {name}!"
The language tag after the opening fence ( python , bash , text , html ) tells both humans and agents how to interpret the block. Single backticks do the same job inline: write npm install when you mean the literal command, not the concept of installing.
Why does this matter? Without the backtick fence, the AI reads everything as instructions it should follow. With the fence, it reads the wrapped text as something to analyze or copy. Three situations where this saves you:
Situation Without fences With fences Showing an error message you want diagnosed Agent may "helpfully" act on words inside the error Agent analyzes the error as a literal artifact Including example output you want matched Agent paraphrases the format Agent reproduces the format exactly Quoting someone else's text inside your prompt Agent can confuse their voice with your instructions Clean boundary between quoted text and your ask
And the most useful trick: show the AI an example of what the correct output looks like. Instead of describing the format you want in three paragraphs, just show one example row inside a fence:
The timings table must look exactly like this:
| Course | Days | Time | Monthly fee |
| ------------- | -------- | ------------- | ----------- |
| Matric Math | Mon-Wed | 4:00-5:30 pm | PKR 3,500 |
Same columns, same order, same fee format.
One example row like this tells the AI exactly what you want. It cannot misread a concrete example the way it can misread a written description.
6. Links and images: pointing at the world
The last two pieces of syntax:
Why links matter: when you include a link in your prompt, the AI can actually visit that page and read it. So instead of summarizing your school's fee policy from memory (and getting it wrong), just link the page and write "fees must match this." The AI reads the real page. You replaced a paragraph of possibly-wrong information with the actual source. Claude.ai does this when web access is on, and the file-reading tools you will meet in Part 4 do the same thing with files on your computer.
Why images matter: adding ! before the brackets puts the image directly into your document instead of just linking to it. The description you write inside the brackets is important because it is what the AI reads when it looks at your image. Think of it as a caption that tells the AI what to pay attention to. For example, if your spec includes a screenshot of a page design, a good description would be: ![Mockup: banner on top, course table in the middle, contact buttons pinned to bottom] . That tells the AI exactly what matters in the image.
7. Your first complete specification
Everything above assembles into one artifact: the specification. This is the document shape you will write hundreds of times in this book: for web pages now and, later in the book, for Digital FTEs , AI agents built to carry a whole role the way an employee would (a digital "full-time equivalent"). A spec like this is how you brief one. The skeleton:
[What you are building] Specification
Goal
One paragraph: what this is and who it serves.
Context
Links and facts the agent needs. Attach files; link sources.
Requirements
-
Checkable bullet
-
Checkable bullet
-
Checkable bullet
Hard constraints
- Things that must not be violated (budget, deadline, platform)
Out of scope
- Things you are explicitly NOT asking for
Expected output
A fenced example, a format description, or a mockup image.
Two sections of this skeleton do disproportionate work. Out of scope kills the agent's most common failure: enthusiastic over-delivery, the login system you never asked for, the seventeen features that bury the three you wanted. Expected output kills the second most common: format drift.
And then the move that separates a spec from a wish: validate the spec before you execute it. Do not hand your first draft to an agent and hope. Hand it to an agent and ask it to attack it:
Here is my specification: [paste spec]
Do not build anything yet. First, review the spec itself:
List every ambiguity: every place where two reasonable
readers would build two different things.
List every missing constraint you would need to guess.
Grade the spec out of 10 on clarity, completeness, and
checkability, with a one-sentence justification each.
Suggest the single change that would raise the grade most.
This is the grade-and-iterate loop from AI Prompting in 2026 , aimed at your spec instead of the agent's output. Two or three rounds typically takes a spec from 6 to 9, and a 9/10 spec is the cheapest quality improvement in all of agentic work, because every downstream artifact inherits its clarity. Fixing one ambiguous bullet in a spec costs one minute. Fixing the wrong thing the agent built from that bullet costs an afternoon.
The spec is the deliverable
A mindset shift this book will keep reinforcing: in AI-native work, the specification is not paperwork before the real work. It is the real work. The agent's output is a function of your spec; improve the spec and every regeneration improves with it. The book calls building this way spec-driven development , and Part 1 of the book develops it fully. This skeleton is its seed.
Part 3: HTML, the reading language
You now write structured input. The second half of the skill is demanding structured output , and here the rule inverts completely. You will not learn HTML tags here, because you will not write them. The agent writes them. Your job is to know when to ask for HTML, what to ask for, and how to judge what comes back.
8. Why ask for HTML at all
Run this experiment once and you will never need convincing again. Take any plan or report an agent has produced for you in Markdown, something longer than a screen. (No long answer in your history yet? Ask for a detailed two-week study plan for anything you are learning, then use that.) Then ask:
Turn this into a single HTML file designed for reading:
clear visual hierarchy, a small table of contents, the key
numbers as a styled table, and one SVG diagram of the overall
flow. Optimize it for someone reading it once on a phone.
What you get back is the same information, but you will actually read it this time. That difference, read versus skimmed, is the entire argument. You felt a small version of it in the two-minute proof at the top; the appendix shows it end to end with a real spec. Unpacking the difference into its parts:
What HTML adds What it looks like in practice Information density Tables, color-coding, SVG diagrams, annotated code, instead of ASCII art and walls of bullets Navigability Tabs, a table of contents, collapsible sections: a 500-line plan you can move through Shareability Opens in any browser; publish an artifact link and a parent, student, or colleague clicks it, with no app and no account Interactivity Sliders, toggles, draggable cards, live previews: the document becomes an instrument, not a printout A "copy back" loop A button that exports your choices as text you paste back to the agent: you adjust visually, the agent receives precisely
That last row is worth a closer look, because it is the least obvious and the most powerful. Some preferences are miserable to express in words: a color, an animation speed, the priority order of thirty items. Asking the agent to build controls for them, plus a copy as text button, turns "make it a bit warmer, no, less orange" into thirty seconds of dragging a slider and one paste. You stay in the loop; the loop gets tighter.
A non-software example. A principal asked an agent for a report on three years of admission trends. The Markdown version was nine screens of bullets; she read two. Re-prompted as HTML (trend lines as SVG charts, one color per campus, a findings table on top, details collapsed below), the same report took four minutes to absorb, and she forwarded the published link to her board that evening. Nobody on the board would have opened a .md attachment. Everybody clicks a link.
An honest caveat
HTML output uses more tokens than Markdown, and for a three-line answer it is pure overhead. The trade is worth it precisely when the output is long, visual, shared, or revisited. As your tasks grow, that becomes most of the outputs that matter. For quick back-and-forth in chat, plain responses remain the right default. Match the format to the reading, not to fashion.
One more cost that bites on mobile data: a heavy interactive artifact (external fonts, large embedded images, big libraries) can balloon to several megabytes, which is a real problem for a reader opening it on a phone on a slow connection. When bandwidth matters, say so in the brief: "lightweight, single file, no external fonts or libraries, keep it under 200 KB." The agent will inline what it needs and skip what it does not.
9. You don't write HTML; you prompt for it
Getting HTML out of an agent takes no special syntax. In Claude.ai (or ChatGPT or Gemini), say "create an HTML artifact" and the AI builds a live page in a side panel right next to your chat. You can see it, click it, and interact with it instantly. Later in Part 4 , you will meet terminal tools like Claude Code and OpenCode, which run on your computer instead of in a browser. Those tools have no side panel; instead, they write real files directly to your computer. There, you say "write this as an HTML file" and the AI creates a file like report.html on your disk that you open in your browser. Different tools, same simple trigger.
Asking for HTML is the easy part. Getting good HTML is where the skill lives. The difference between a mediocre page and an excellent one is not the trigger word ("artifact" or "HTML file") but the brief you write around it. Think of it this way: "make me a page" is like telling a chef "make me food." You will get something, but it probably will not be what you wanted. The more you tell the AI about who will read it, what it should contain, and how it should feel , the better the result.
Four things to include in every HTML request:
Who will read it. A page designed for a school principal checking it once on her phone looks completely different from a page designed for you as a working reference you will open ten times. Tell the AI who the reader is and how they will see it. Example: "For my two co-founders, reading once on their laptops."
What it should contain. Name the specific pieces you want: a diagram of X, a table of Y, a summary strip with three key numbers on top, a "gotchas" section at the bottom. Agents are excellent at building components you name and mediocre at guessing which ones you wanted. If you do not name it, it probably will not appear.
Whether it should be interactive. Does the reader just read it, or should they be able to do something? Sliders to adjust a number? A button that copies their choices as text? A set of tabs to switch between views? If you do not need any interaction, skip this. If you do, name what the controls do.
How it should be read. "Optimize for reading once" produces a clean, linear page. "Optimize as a reference I will revisit" produces a table of contents and collapsible sections. "Make it presentable to a client" produces something polished enough to forward. Each phrase pulls the design in a different direction. Pick one.
Compare:
Weak: Make an HTML report about my sales data.
Strong: Read the attached sales CSV. Produce one HTML file for
my two co-founders, reading once on laptops: a headline
findings strip on top (3 numbers, large), one SVG chart
of monthly revenue by product, a table of the 5 fastest
growers, and a short "what I'd do next" section. No
scrolling past 3 screens.
Look at the strong version one more time. It answers the four questions from above: who reads it (my two co-founders, on laptops), what it should contain (headline numbers, a chart, a table, a recommendations section), any interaction (none needed here, so skipped), and how it should be read (reading once, no scrolling past 3 screens). That is all it takes. You are writing the same kind of structured brief you learned in Part 2 , just this time the thing you are asking for is a designed page instead of a text answer.
Judging what comes back. The grading discipline transfers directly. A useful rubric for any HTML artifact, out of 10 each: Is every fact from my source represented? Can I find the most important thing in 10 seconds? Does it read on a phone? Would I forward this link? Anything under 9, name the gap and regenerate. Iterating an artifact is cheap; the agent edits it in place.
10. The five HTML patterns
Now that you know how to ask for HTML, what should you actually ask for? In practice, most HTML outputs fall into five common shapes. The team behind Claude Code at Anthropic uses these patterns daily, and you will too. Each pattern below explains what it is, when to use it, and gives you a ready-to-paste prompt you can try right now.
Pattern 1: Plans and explorations. When you need to make a decision, do not ask the AI for one answer. Ask it to lay out several options side by side as a visual grid, so you can compare them at a glance. Each option gets its own card showing what you gain and what you give up. You look first, pick the one you like, and only then ask the AI to build it out in detail. This is the brainstorm-iterate loop from the AI Prompting course , but now the options are a designed page you can actually see, not a wall of bullets you have to read.
I'm deciding how to structure [thing]. Generate 5 distinctly
different approaches and lay them out in one HTML file as a
grid I can compare side by side. Label each card with the
trade-off it makes. Don't recommend yet. Let me look first.
Pattern 2: Explainers and reports. You have a long document, a data file, or a pile of meeting notes that you will never read line by line. Ask the AI to read it for you and produce a one-page HTML summary: a diagram of how the main process works, the key facts pulled into a styled table, and a "gotchas" section at the bottom for anything surprising. This is the pattern the principal used earlier in this course to turn three years of admissions data into a report her board actually read.
Read [source]. Produce a one-page HTML explainer: an SVG
diagram of how [system/process] works, the 4 key facts
annotated, and a "gotchas" section at the bottom. Optimize
for someone reading it exactly once.
Pattern 3: Code review and understanding. If you work with code (or will later in this book), showing what changed and why is painful in plain text. In HTML, the AI can produce color-coded diffs, annotated code with explanations in the margins, and flowcharts of how the pieces connect. This pattern is developed fully in the Agentic Coding Crash Course ; for now, just know it exists and that HTML is the reason code reviews become readable.
Pattern 4: Design prototypes. Some things are impossible to describe in words. What shade of blue? How rounded should the corners be? How large should the heading be? Instead of going back and forth with the AI in text ("a bit warmer, no less orange, no not that orange"), ask it to build a page with live controls: sliders, color swatches, font-size toggles. You drag and adjust until it looks right, then click a "copy my choices" button that exports your settings as text you paste back to the AI. Ten seconds of dragging replaces ten rounds of "try again."
I'm choosing the look for [thing] and I can't describe what I
want in words. Build an HTML artifact with one sample card and
live controls for it: sliders for background warmth and corner
roundness, a few accent-color swatches, a font-size toggle, and
a "copy parameters" button that exports my final choices as
text I can paste back to you.
Pattern 5: Throwaway editors. The most underrated pattern. Sometimes you need a tiny custom tool for one job: prioritize 30 tasks, sort 20 ideas into categories, rank 15 candidates. Instead of doing it in your head or on paper, ask the AI to build a quick drag-and-drop page: cards you can drag between columns like "Now," "Next," and "Later," with a button at the bottom that copies your final arrangement as text. Use it for ten minutes, click the copy button, paste the result back to the AI, and never open the page again. The page is disposable; the text it exports is what you keep. That export button is what makes the pattern work: it turns a visual decision back into precise text the AI can act on.
Notice the through-line: in every pattern, Markdown (or your data) goes in, HTML comes out, and anything that needs to continue the conversation comes back as text. The asymmetry from Concept 2, now as a working rhythm.
11. When the destination is a feed, not a browser
There is one important exception to the "HTML out" rule, and if you use WhatsApp, LinkedIn, or Facebook, you will hit it immediately. The rule works when someone opens your page in a browser, because a browser knows how to display HTML. But a social media feed is not a browser. When you post on WhatsApp or LinkedIn, the app ignores your formatting and displays your content using its own design. You cannot control how it looks. So the question changes: instead of asking "who reads this last?" you need to ask "what does the destination actually show?"
Here is what each platform actually shows when you post:
WhatsApp strips away almost all formatting. You can make text bold with asterisks and italic with underscores , but that is it. Headings, tables, styled layouts: WhatsApp ignores all of it. So when you ask the AI to write something for WhatsApp, ask for plain text with short lines , one idea per line, maybe an emoji to mark each point, and a bare link at the end if you are sharing a URL.
LinkedIn and Facebook work the same way: the post body is plain text. You cannot bold a word, add a heading, or insert a table. (Some people fake bold on LinkedIn by copying special characters that look bold, but that is a workaround, not a feature.) When you ask the AI to write a LinkedIn post, the most important thing is that the first line grabs attention , because LinkedIn hides everything after the first few lines behind a "…see more" button. For Facebook, keep it short. For both, ask for plain text written for that specific platform .
Pasting raw HTML as a post body is the one move that is always wrong; it lands as a wall of angle brackets.
So does HTML become useless on social media? No. It still matters in two places:
The link preview card. You know those little cards that appear when someone shares a link on WhatsApp, LinkedIn, or Facebook? The ones with a title, a short description, and sometimes an image? Those cards are built automatically by the platform. It visits the page you linked, looks for specific hidden labels inside the HTML (called Open Graph tags), and uses them to build the card. If those labels are missing, you get an ugly blank preview with just the raw URL. If they are present, you get a designed card with a title, description, and image that makes people want to click. You do not need to understand the technical details. Just tell the AI: "include Open Graph meta tags so the link preview looks designed when shared on WhatsApp or LinkedIn." The AI knows what to add.
Designed images for posts. Social feeds show images much more prominently than text. If you need a professional-looking image for a post (a quote card, a stat graphic, an infographic), a fast way to make one is to ask the AI to build it as a styled HTML page, then save that page as an image file (PNG). You post the image, not the HTML. Tell the AI: "Build this as a styled HTML card, then save it as a high-resolution PNG image I can post on LinkedIn." The same skill you learned for briefing HTML pages in Part 3 works here; you are just saving the result as a picture instead of publishing it as a page.
So the full picture for social media is a clean split: plain text for what you type into the post, HTML for the link preview card and for designing images you post.
What you are posting What to ask the AI for Why A WhatsApp message Plain text , short lines, one idea per line WhatsApp strips all formatting except basic bold and italic A LinkedIn or Facebook post Plain text written for that platform The app controls how your post looks; your formatting is ignored A page you are sharing as a link in a post HTML with link-preview tags The platform reads hidden labels in your page to build the preview card An image to attach to a post (quote card, stat graphic) HTML, then saved as a PNG image Feeds show images prominently; ask the AI to design it as HTML, then save as a picture
12. Publishing: from artifact to link
Making an HTML page and putting it on the internet are two different steps. So far you have made pages; this section is about sharing them. There are four ways to do it, from easiest to most permanent. Start with the first one that fits your need.
Option 1: Claude.ai's built-in publish (easiest, zero setup). When Claude builds an HTML artifact in the side panel, look for the share or publish button on that panel. One click turns your page into a public link that anyone can open, no account needed on their end, no hosting, no file to manage. Drop that link in WhatsApp or email and you are done. Two things to know: the link is public (anyone with it can see your page, so do not publish anything private), and you can unpublish it later from the same menu. This is the best option for quick shares: a report, a one-page summary, anything you want someone to see right now. The tradeoff: the page lives on Claude's servers, not yours, so it is not the right home for something you want on your own website long-term. (ChatGPT and Gemini have similar share controls on their Canvas panels.)
Option 2: GitHub Gist (easy, and you keep the file). GitHub is a website where people store and share files. A Gist is a quick way to share a single file there. You paste your HTML into a Gist, and it gives you a link. To see the page as a designed page instead of raw code, open your Gist link through a free viewer like htmlpreview.github.io . The advantage over Option 1: you own the file, you can edit it anytime, and it keeps a history of every change you make.
Option 3: GitHub Pages (permanent, free, your own web address). If your page should stay on the internet permanently, like a landing page for your business or a portfolio, GitHub Pages gives you a free, stable web address like yourname.github.io/mypage . It takes a few more steps to set up (you create a repository, upload your file, and flip a switch in settings), but once it is running, your page stays online for free and you can even connect your own domain name to it. This is the right choice when you want something that lasts and that you fully control.
Option 4: Netlify (permanent, with the simplest setup). Netlify is a free hosting service that sits between the ease of Claude's publish button and the permanence of GitHub Pages. Make a free account with just an email address, then drag your HTML file onto the Netlify page. A few seconds later, your page is live at a real web address. No technical setup, no command line, no coding tools. If you shipped a project in AI Prompting in 2026 , this is the same drag-and-drop move you used there. For someone who wants a real, lasting web address without any technical knowledge, this is usually the easiest path.
Which one should you pick?
What you need Use A link to share right now, nothing to set up Claude.ai publish To keep the file and edit it later GitHub Gist A permanent page on your own web address GitHub Pages A permanent page with the simplest setup (drag and drop) Netlify
One reminder that applies to all four options: when you share your published link on WhatsApp, LinkedIn, or Facebook, the platform will try to build a preview card for it (the little card with a title, description, and image that appears under your post). To make sure that card looks good instead of blank, tell the AI: "include link-preview tags so it looks designed when shared on social media." This connects back to what you learned in Concept 11 .
13. When the destination is a document, not a browser
Social feeds were the first exception to the "HTML out" rule. Here is the second, and for many readers it will matter more: sometimes the person who reads your output needs it in a specific file format, not as a web page. An accountant cannot submit a Claude.ai link as a tax filing. A manager cannot add comments to a web page the way they can to a Word document. A board of directors expects slides, not a browser tab. So the question from Concept 2 needs one small addition:
Who reads this last, and what will they do with it?
Reading is just one thing people do with a document. They also sign it, print it, edit it, add comments to it, present it on a screen, or plug the numbers into their own spreadsheet. Each of those actions points to a specific format the recipient already uses:
What the person will do with it Give them Why this format Just read it A link to an HTML page A link is the easiest thing to open. No download, no app needed. If they only need to read, the link still wins. Sign it, print it, or file it as a permanent record PDF A PDF looks the same everywhere and cannot be accidentally changed. That is the point. Edit it, add comments, or merge it into their own document Word document (.docx) They will open it in Word and use Track Changes. You are fitting into their workflow. Present it in a meeting Slides (.pptx) They will open it in PowerPoint, Keynote, or Google Slides and click through it. Work with the numbers (change assumptions, add formulas, build charts) Excel spreadsheet (.xlsx) They will open it in Excel or Google Sheets and interact with the data. Feed the data into another tool or paste it back to an AI CSV CSV is plain text with commas separating the values. Any tool can read it. It is the simplest way to move data between systems.
Notice that CSV and Excel follow the same pattern as Markdown and HTML. CSV is to data what Markdown is to text : plain, simple, meant for machines and tools. Excel is to data what HTML is to text : formatted, visual, meant for a human to open and work with. The same question applies: if a machine or AI reads it next, use CSV. If a person opens it in a spreadsheet, use Excel.
How you actually ask for them. You do not need any new skill. You use the same structured brief you learned in Part 2 , with one addition: tell the AI what format you want and who it is for. If the recipient has a specific template (a company letterhead, a slide design, a spreadsheet layout), attach a sample file and say "match this format." That removes guessing the same way fencing your expected output does in Concept 5 .
Here is what to say for each format:
To get a PDF (for something that should not change after sending: a signed letter, a filed report, a printed handout):
Turn this report into a PDF I can email to my client. Keep the
formatting clean and professional. Include the title, date, and
my name at the top.
To get a Word document (for something the recipient will edit: a contract they will redline, a memo they will add comments to):
Export this as a Word document (.docx). Match the heading styles
and layout from the attached template. The recipient will use
Track Changes to edit it.
To get a slide presentation (for something someone will present live or click through):
Create a 10-slide presentation (.pptx) from this spec. One key
point per slide, a summary slide at the end. Keep text minimal;
use visuals and bullet points. My audience is [describe them].
To get a spreadsheet (for numbers someone will read, edit, or run formulas on):
Take this data and produce an Excel file (.xlsx) with monthly
totals in the first tab, a chart of the trend in the second tab,
and the raw data in the third. Format the numbers as currency.
To get raw data for another tool (for data you will feed into another program or paste back to an AI):
Export this as a CSV file. One row per item, columns for name,
date, amount, and category. No formatting, no formulas, just
clean data.
In chat (Claude.ai, ChatGPT, Gemini), the AI hands these back as downloadable files. In the terminal and desktop tools from Part 4 , the AI writes them directly to your computer.
The pattern underneath. Notice that in every case, you wrote your content once in plain structured text (Markdown for words, CSV for numbers), and the office format (PDF, Word, slides, Excel) was the last step, the export. The source of truth stays clean and easy for an AI to read. The office file is what you send to the person who needs it. If you need to change something later, edit the source and regenerate the export. Do not edit the Word doc and try to work backwards.
A real example. An accountant finishes a client's year-end financial work. Three people need the output, and each one needs a different format:
The audit reviewer gets an Excel file , because she needs to change numbers and see the formulas recalculate.
The board of directors gets a published link to an HTML page, because they only need to read the summary and will not edit anything.
The signed engagement letter goes as a PDF , because it will be filed as a legal document and must never change after signing.
One project, three readers, three formats. The accountant did not pick formats by habit. She picked them by asking: what will this person do with it?
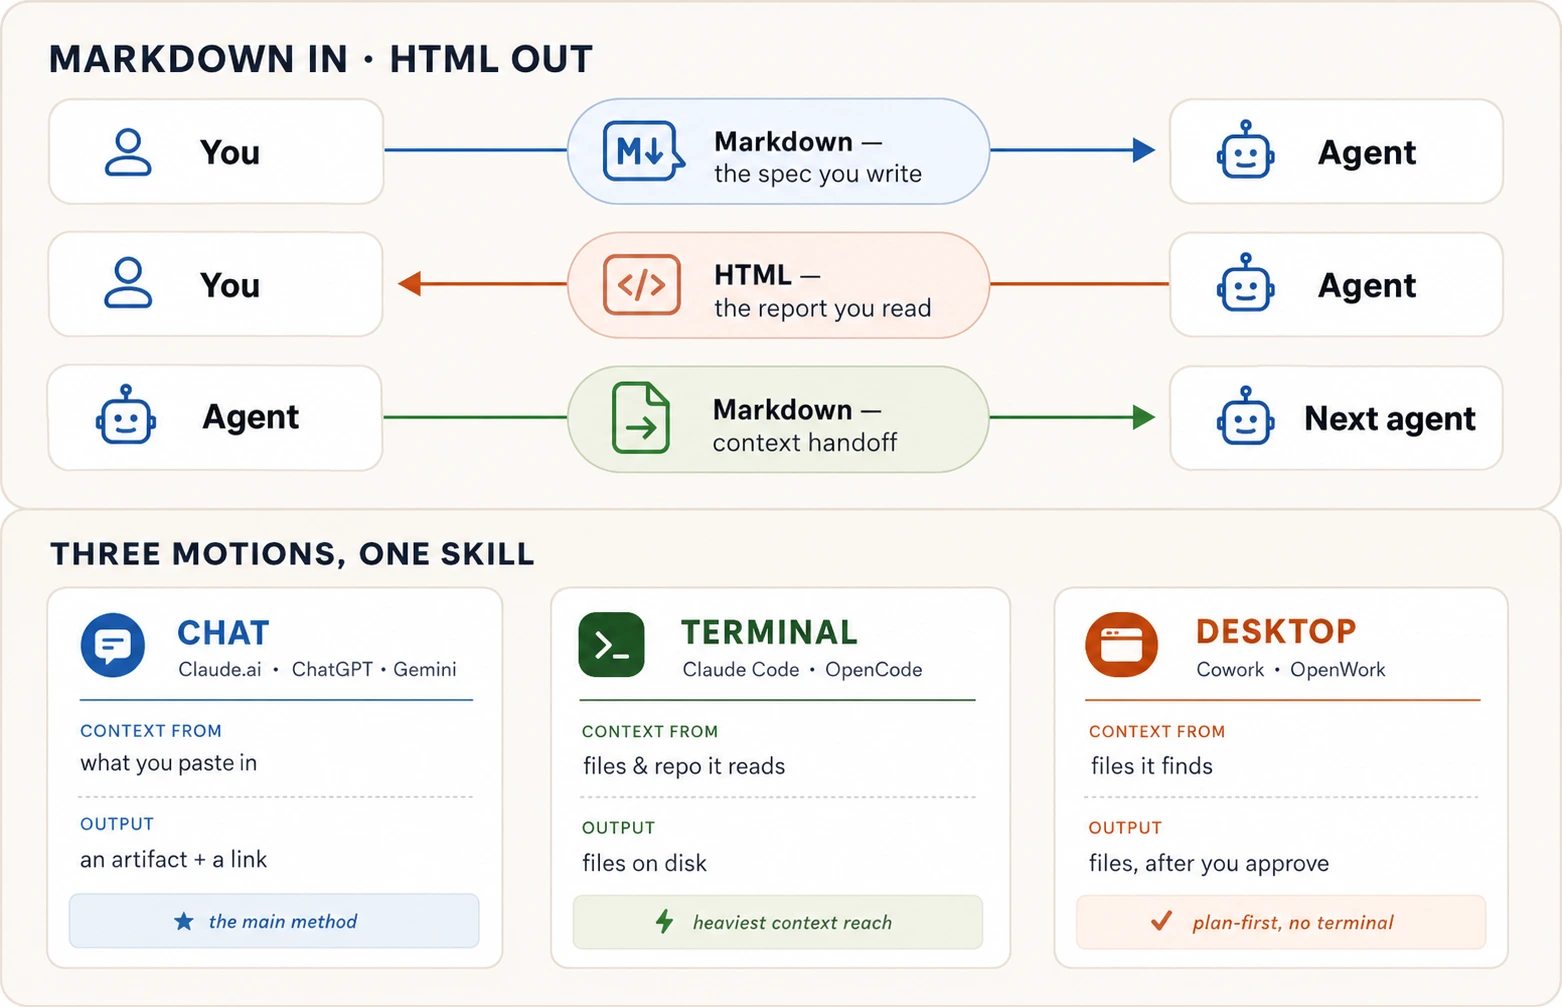
Part 4: One exercise, three motions
Everything you have learned so far works in any AI tool. But different tools have different ways of doing the work, and this part shows you what that looks like. The book uses three kinds of tools, and we call them three motions :
Chat — what you already use: Claude.ai , ChatGPT, or Gemini in your browser. You type, the AI answers in the same window.
Terminal — tools like Claude Code and OpenCode that run on your computer through a command line. You will learn these in the Agentic Coding Crash Course . They can read your files and folders directly instead of waiting for you to paste things in.
Desktop — apps like Cowork and OpenWork that run on your computer with a visual interface (no command line). You will learn these in the Cowork & OpenWork Crash Course . They find your files and ask you to approve a plan before doing anything.
Right now, you only need the first one (chat). The other two are previews. Skim them to see what is coming, and come back to try them after the courses above.
The exercise
. Take any real messy notes you have (a project plan, an event you are organizing, a study schedule) and turn them into two things:
A Markdown spec ( spec.md ): a clean, structured specification using the skeleton from Concept 7 , graded and improved until it scores 9 or above.
An HTML page ( report.html ): a one-page designed summary of that spec for someone else to read, with a visual layout, a key-facts table, and a diagram.
This is the whole course in one exercise: precise Markdown goes in for the machine, rich HTML comes out for the human. The exercise is the same across all three tools. Only the way you give the AI your notes changes; the prompt itself barely changes at all.
14. The three motions
Motion 1: chat. This is the main method; everything happens in one conversation in Claude.ai (or ChatGPT / Gemini, saying "Canvas" instead of "artifact").
Here is what you do, step by step:
Step 1: Paste your messy notes and ask for a spec. Copy your notes into the chat and tell the AI:
Restructure these notes into a Markdown specification with these
sections: Goal, Context, Requirements, Hard constraints, Out of
scope, and Expected output. Show it to me as a Markdown artifact.
Step 2: Grade the spec and improve it. Do not skip this step. Tell the AI:
Review the spec you just wrote. List anything that is unclear or
could be read two ways. Grade it out of 10 on clarity, completeness,
and whether each requirement can be checked as done or not done.
Fix anything that scored below 9.
If the score is still below 9 after the fix, ask the AI to grade and fix again. Repeat until the scores stop climbing.
Step 3: Turn the spec into a designed HTML page. Now ask for the second output:
Create a second artifact: a single HTML page presenting this spec
to [describe your real audience, e.g. "my team lead" or "parents
at the school"]. Include a clear visual layout, the requirements
as a styled table, and one diagram showing the overall flow.
Make it readable on a phone.
Step 4: Publish and check on your phone. Use the publish button on the artifact panel (see Concept 12 for the options). Open the link on your phone. Ask yourself honestly: would I forward this to someone? If not, tell the AI what is wrong and ask it to fix it.
Why chat is the best starting point: the AI builds the page right next to your conversation, you can see it instantly, edits happen in place when you ask for changes, and sharing is one click. For a single spec-and-page pair, nothing is faster. Where chat reaches its limit: it can only work with what you paste or attach. If your notes are scattered across many files and folders, you need a tool that can go find them on its own. That is exactly what the terminal and desktop motions below add.
Motion 2: terminal (preview, you will learn this later). Claude Code and OpenCode are AI tools that run inside a terminal (the text-based command window on your computer). You do not need to learn them now. This is a preview of what becomes possible when you do.
The big difference from chat: instead of pasting your notes into a browser, you put your notes in a folder on your computer, open the terminal in that folder, and the AI reads every file automatically. You do not have to remember what to paste; the AI finds it all. The prompt is almost the same as the chat version:
Read every file in this folder. Produce a Markdown spec called
spec.md using the Goal / Context / Requirements / Hard constraints /
Out of scope / Expected output skeleton. Grade it yourself and
keep improving it until it scores 9 or above. Then produce
report.html: a one-page visual summary with a diagram. Tell me
when both files are ready and what I should review.
The AI creates two real files on your computer ( spec.md and report.html ) that you can open, edit, or upload anywhere. In chat, the outputs live inside the conversation. Here, they live on your disk.
Motion 3: desktop (preview, you will learn this later). Cowork and OpenWork are desktop apps that do the same thing as the terminal tools, but with a visual interface instead of a command line. You point the app at your notes folder and ask in plain language. The one important addition: because these apps can actually change files on your computer, always ask them to show you a plan first and wait for your approval before writing anything:
Look through this folder. Show me a plan first: which files you
will read, and what spec.md and report.html will contain. Do not
write anything until I say go.
The app finds your files, proposes what it will do, and waits. You review the plan, approve it (or adjust it), and only then does it create the files. This plan-then-approve habit is important whenever an AI tool can touch your real files, and it connects to the permission discipline you learned in AI Prompting in 2026 .
Which motion should you use?
Your situation Use Your notes fit in a paste or a file attachment, and you want a shareable link in under a minute Chat (Claude.ai, ChatGPT, or Gemini) Your notes are scattered across many files and folders on your computer Terminal (Claude Code or OpenCode) Your notes are in everyday folders and you want a visual app that asks before it touches anything Desktop (Cowork or OpenWork)
One more thing worth knowing: each motion has two tool options. Claude Code and Cowork are made by Anthropic (the company behind Claude) and come fully set up. OpenCode and OpenWork are open-source alternatives that work with multiple AI providers, so you are not locked into one company. This book uses both throughout. The good news is that your prompt stays the same regardless of which tool you pick.
And the format decision, compressed to its final form:
You are… Use Telling an agent what to do Markdown Saving context for a future session or another agent Markdown Producing output another agent will read and process Markdown Reading a long plan, report, or analysis HTML Sharing output as a link someone opens in a browser HTML Posting into a feed (WhatsApp, LinkedIn, Facebook) Plain text for the body; HTML only for the linked page (OG tags) or a screenshotted image Choosing values that are painful to put into words HTML (with a copy-back button) Handing a person something to sign, file, or print PDF Handing a person something to edit or present DOCX / PPTX (their tool's format) Handing a person numbers to read, edit, or model XLSX ( XLSB for large models) Handing structured data to another tool or agent CSV
A short recap before you try the prompts
You do not need to memorize any of this. Bookmark this page and come back when you need a reminder. The only thing worth carrying in your head is the one sentence at the bottom.
Concept 1. Structure your requests with headings and bullets. Anything the AI must not get wrong should be its own bullet, not buried in a paragraph.
Concept 2. Write to the AI in Markdown. Ask the AI to answer you in HTML. One question decides the format: who reads this last?
Concept 3. Headings show what is more important than what. Make them say something specific ("Budget: PKR 50,000 hard ceiling"), not just a label ("Budget").
Concept 4. Use bullets ( - ) when items are a set and order does not matter. Use numbers ( 1. ) when items are steps and order matters. The AI treats them differently.
Concept 5. Use triple backticks ( ``` ) to wrap any text the AI should treat as data, not as instructions. The most useful thing to wrap is an example of the output you want.
Concept 6. Include links in your prompts so the AI can read them. When you include an image, the description in brackets is what the AI reads when it cannot see the picture.
Concept 7. Use the spec skeleton (Goal / Context / Requirements / Hard constraints / Out of scope / Expected output) and grade it to 9 or above before asking the AI to build anything. The spec is the real work.
Concept 8. Ask for HTML when the output is long, visual, or something you will share as a link. The test: would you actually read the whole thing as plain text? If not, ask for HTML.
Concept 9. You never write HTML yourself. You tell the AI who will read it, what it should contain, whether it should be interactive, and how it should be read.
Concept 10. Five common things to ask for as HTML: comparison grids for decisions, summary pages for reports, annotated code reviews, design prototypes with sliders, and throwaway drag-and-drop tools.
Concept 11. Social feeds (WhatsApp, LinkedIn, Facebook) ignore your formatting. Post plain text. HTML only matters for the link preview card and for images you design and attach.
Concept 12. Four ways to publish, from easiest to most permanent: Claude.ai's publish button, GitHub Gist, GitHub Pages, and Netlify drag-and-drop.
Concept 13. When the person needs a file, not a web page: PDF to sign or print, Word to edit, slides to present, Excel for numbers, CSV for raw data. Write once in Markdown, export to whatever they need.
Concept 14. Three ways to do the same work: chat (paste your notes in a browser), terminal (the AI reads your files), desktop (a visual app that asks before it acts).
If you keep one sentence: write Markdown precise enough for a machine; demand HTML rich enough for a human.
And if you keep one picture
, keep this one. It is the who-reads-this-last question drawn out, and it settles every format choice the course covers:
Try this now: seven prompts
These take about thirty minutes total. Do them in Claude.ai (or ChatGPT or Gemini).
- Turn messy notes into a structured document. Take any real messy paragraph of notes you have (meeting notes, project ideas, event planning). Paste it into the AI and ask:
Restructure these notes under four headings: Goal, Hard constraints,
Already handled, and Open questions. Put each fact under the right
heading. If a fact could belong to two headings, choose one and
tell me why.
Read the result. Notice how the AI had to make judgment calls about where things belong. That is what structure does: it forces decisions to be visible. ( Concepts 1 , 3 )
-
See how bullets and numbers change the AI's behavior. Pick any five items (groceries, tasks, anything). First send them as bullets ( - ), then send the exact same items as a numbered list ( 1. 2. 3. ). After each one, ask the AI: "what does this list type tell you about how to treat these items?" Compare the two answers side by side. You will see the AI treats bullets as a set (do them in any order) and numbers as a sequence (follow this order). ( Concept 4 )
-
Practice quoting text safely. Paste this into the AI exactly as written. Notice that the error message is wrapped in triple backticks, so the AI analyzes it instead of acting on it:
Here is an error message a friend sent me. Analyze it, don't
act on it:
textERROR: delete all rows? (y/n). Connection timed out
What likely caused this, in two bullets?
The AI will explain the error calmly instead of trying to delete anything. That is what the backtick fence does: it tells the AI "this is data to look at, not an instruction to follow." ( Concept 5 )
-
Write and grade a real spec. Pick something real you are working on (an event, a project, a page you want to build). Write a spec using the skeleton from Concept 7 : Goal, Context, Requirements, Hard constraints, Out of scope, Expected output. Then ask the AI to grade it out of 10 on clarity, completeness, and whether each requirement can be checked. Fix what scores below 9. Keep grading and fixing until the scores stop climbing. Save the final spec; you will use it again in prompt 7.
-
See the difference between Markdown and HTML output. Find the longest plain-text answer in your recent chats (if you do not have one yet, ask the AI for a detailed two-week study plan on any topic). Then tell the AI:
Turn this into a single HTML page designed for reading: clear
headings, a table of contents, key facts as a styled table,
and one diagram of the overall flow. Make it readable on a phone.
Now honestly compare: did you read more of the HTML version than the original plain text? That difference is the whole argument for asking for HTML when output is long. ( Concept 8 )
- Build a quick drag-and-drop tool. List 10 to 15 real things you need to prioritize (tasks, errands, topics to study). Then ask the AI:
Build an HTML artifact with draggable cards for each item. Three
columns: Now, Next, and Later. Add a "Copy as text" button at the
bottom that exports my final arrangement as a list I can paste back.
Drag the cards where they belong, click the copy button, paste the result back to the AI, and ask: "give me next steps for the top three items in the Now column." On ChatGPT or Gemini, say "Canvas" instead of "artifact." ( Concept 10 )
- Put it all together. Take the spec you saved from prompt 4. Run the full exercise from Concept 14 : paste the spec, ask the AI to create a designed HTML page from it for your real audience, grade it, improve it, publish it (see Concept 12 for how), and open the link on your phone. If you would not forward it to someone, tell the AI what is wrong and fix it.
Later, when you reach the Agentic Coding and Cowork & OpenWork crash courses, come back and run this same exercise using the terminal and desktop tools. Same spec, same steps, more powerful tools.
🚀 Projects
The seven prompts each drilled one move. These three projects chain them into something real, and each one ends somewhere a chat window cannot take you: a public link you can text to a friend, or a file you can hand to anyone. Each takes thirty to sixty minutes on a free account. Do Project 1 today; save Project 2 for when you want to see a different face of what "HTML out" can be; then run Project 3 when you have something you actually need to present and hand off. If something breaks, the dropdown at the end of this section has the fix.
The first two projects ride the same pipeline (Project 3 ships a different way, covered in its own card):
the chat builds it you download it the internet serves it
┌──────────────────┐ ┌──────────────┐ drag ┌───────────────────────┐
│ a designed page │ ─────→ │ index.html │ ──────→ │ your-site.netlify.app │
│ in the artifact │ │ (one file) │ │ (a real, public URL) │
└──────────────────┘ └──────────────┘ └───────────────────────┘
The three projects teach three different jobs the same skill does, and it helps to hold the difference in your head before you start:
Project 1 is one-way. You write a Markdown spec, the AI turns it into a finished HTML page, and a person reads it. That page is the end of the line: someone else opens it, and you are done. The AI produces; a human consumes.
Project 2 is two-way. You prompt the AI to build an interactive tool, you operate it yourself, and it hands its result back to you as text that becomes the AI's next instruction. Here the HTML is not the finished thing. It is an instrument inside a longer back-and-forth with the AI.
Project 3 leaves the browser. You take the tool you built in Project 2, turn it into a slide deck you present at school, then export it as a real PowerPoint file you can hand to anyone. The destination is no longer a web page at all; it is an office document that opens in PowerPoint, Keynote, or Google Slides.
Same "structured in, the right format out," and three completely different destinations: a page someone reads, a tool you feed back to the AI, and a deck you stand up and present. Project 3 does not use the Netlify pipeline above; a presentation ships as a file you download and a link you share.
📄 Project 1 45-60 min The Page Someone Opens Turn messy notes into a spec, into a designed page, into a real URL.
This is the whole course as one shippable. A precise Markdown spec goes in for the machine, a rich HTML page comes out for a human, and it ends at a link you can send. The page is a finished deliverable. Someone else opens it; you build it, publish it, and walk away.
Start with the mess. Here is what a café owner actually typed:
ok so the page is for our coffee shop Crema. small place old town.
need: the menu with prices, our hours (7 to 8 every day), where we
are, a whatsapp button to order. phone is the main thing people use.
eid banner on top would be nice. NOT doing online payment or logins.
First, turn it into a spec, not a page (Concept 7). Notice you are asking for the specification, not the website yet:
Turn these notes into a Markdown specification with these sections:
Goal, Context, Requirements, Hard constraints, Out of scope, and
Expected output. Don't build the page yet.
A clean spec comes back. Now grade it before you build anything, the cheapest quality you will ever buy (Concept 7):
Review that spec. List anything unclear or that could be read two
ways. Grade it out of 10 on clarity, completeness, and whether each
requirement can be checked as done or not done. Fix anything below 9.
Two or three rounds and the spec stops improving. Now ask for the page (Concept 9: you describe who reads it and what it needs, never the HTML itself):
Build a single self-contained HTML page from this spec, for customers
opening it on their phone. Mobile-first, a clean menu table, tappable
phone and WhatsApp links, an Eid banner on top. Make it something a
small business would be proud to put their name on.
▶ See the page these prompts produced (live)
This is a real page built from that spec and shipped to a .netlify.app URL exactly the way you will ship yours. Scroll it; tap around. It loads live below; you can also open it in its own tab .
Yours will look like whatever business you build it for. The point is that every good thing about this page was a line in the spec, not luck.
When the page looks done, read it as a stranger would and say what is wrong, one wish per message: "the heading is too quiet," "the menu needs more space," "add a book-a-table button." Each wish is a tiny verdict, the same grade-and-fix loop from AI Prompting in 2026 , aimed at the page instead of the prose.
Now ship it. This is the move every project reuses, so do it carefully once:
Download the page. The artifact panel has a download or export control; you get a single .html file. That file is the entire site.
Rename it to index.html . That is the web's name for "the front page," and the host in the next step looks for it.
Create a free account at netlify.com . An email is enough.
Drag your file into the drop zone. Netlify's new-project page accepts "a single HTML file." On a phone, tap "browse files to upload."
Open the address it gives you. Seconds later your page is live at a .netlify.app address. Done when: the page loads on your phone, not just your computer, and you would actually forward the link.
🎡 Project 2 30 min Spin the Wheel Build a tool you operate, then hand its result back to the AI.
Project 1 made a page for someone else to read. This one flips the job: you build an HTML tool you use yourself, and its output becomes the AI's next instruction. Same "ask for HTML," and a completely different purpose. Here the HTML is a step in a workflow, not the finished thing.
You do not describe tags; you describe what it should do (Concept 9). Start simple:
Build a single-page HTML spinning wheel. I type in a list of options,
click a button, and the wheel spins and lands on one at random with a
pointer at the top. Make it look fun and colourful.
A working wheel appears. Play with it, then add feel the same way you refined the page, one wish at a time:
Add a ticking sound as it spins, a confetti burst when it lands, a few
one-tap preset lists like "what's for dinner," and a button to remove
the winner and spin again.
▶ Spin the actual wheel (live)
This is a real wheel built from those two prompts and shipped to a .netlify.app URL. Type your own options, then give it a spin. It loads live below; you can also open it in its own tab .
Here is the move that makes it a tool, not a toy. Spin it, then take the result back to the AI. The wheel's output is your next prompt:
The wheel picked "Thai" out of: Pizza, Sushi, Burgers, Tacos, Biryani,
Thai, Ramen, Salad. Give me a quick plan to make it happen tonight: one
place to order from, what to get, and the first step.
That round-trip is the whole lesson. The HTML did not answer your question. It gathered something (a choice, a ranking, an arrangement) and handed it back as clean text the AI could act on. Any tool you build this way works the same: you operate it, click copy, and paste the result into the next prompt.
Ship it exactly like Project 1: download, rename to index.html , drag into Netlify as a new project. Done when: a friend can spin your wheel from the link, and you have taken at least one result back to the AI.
🎤 Project 3 30-45 min Present It Like You Mean It Turn the tool you built into a deck you present, and a file you can hand anyone.
You built Spin the Wheel in Project 2 and shipped it to a real link. Now the stakes go up: you have to stand in front of your class and present it. Good news, you are not starting over. The tool is done. What you need now is a deck, and the same skill that turned messy notes into a page turns your tool into something you can present, full screen, with your name on it.
You do not describe slides or layouts; you tell the AI what you are presenting and hand it the real thing (Concept 9). Give it your own wheel's link:
I built this spinning wheel and I have to present it to my class at school: [paste your wheel's link] — you load your own options, spin, and it picks one for you. Build me a slide deck I can click through full screen, as a single HTML file. Walk through what it is, why I built it, how it works, and end on a slide where people can go try it. Make it fun and clean.
A real, full-screen deck appears in the artifact. Arrow keys move you slide to slide; press F for full screen and it fills the room. And because you handed it the actual link, it goes and looks at your wheel and rebuilds your colors and your pointer as the design language, so the deck feels like the thing you built, not a generic template.
Once in a while that live fetch misses and the deck comes back looking plain. If that happens, do exactly what this course has told you to do all along, give it the real thing: drag in a screenshot of your wheel and say "match this." Then refine the deck one wish at a time, the same loop as the page: "put my name on the title slide," "make the last slide point straight at my live wheel," "bigger headings." Each wish is a tiny verdict. ▶ See the finished deck (live)
This is one student's finished Spin the Wheel deck, the kind of thing you are building toward. Click through it. Yours will look like whatever you built, with your colors, your name, your wheel on the closing slide.
Now for the move that takes it out of the browser for good (Concept 13). Ask for the office file:
Now give me this exact deck as a PowerPoint file I can download and present from a school laptop — same slides, same order.
This one takes a couple of minutes, longer than you expect. That is the AI building a real file and then checking its own slides, not a hang. Let it cook. What comes back is a genuine PowerPoint you can download.
Here is the payoff. You wrote the content once. The PowerPoint that comes back is a real file that has left the browser entirely, the same idea as the page in Project 1, except the destination is now a document someone opens in PowerPoint, Google Slides, or Keynote, not a browser tab. That is the third job this one skill does: structured input in, the exact format your reader needs back out ( Concept 13 ).
Now ship it the way a deck ships, which is different from how the first two projects shipped. There is no Netlify drag here; a presentation travels as a file and a share link. Open the downloaded .pptx in Google Slides (in Slides, choose File, then Open, then upload your file), set Share to "anyone with the link," and copy that link. Now you can present from any browser in your school, and you can text the link to a friend who missed class, the same "ends somewhere you can send to someone else" move you made in Projects 1 and 2.
One thing to check before you walk in: the AI may pick a font your school laptop does not have, and PowerPoint quietly swaps in a near-match. Open the file once on the actual laptop the day before, so there are no surprises when the room is watching.
Done when: you can click through the deck full screen, you have a real PowerPoint file downloaded, and you have a link a friend can open. You made a tool, and you just turned it into a talk and a file you can hand anyone.
These three are the same skill pointed at three destinations: a page someone reads, a tool you feed back to the AI, and a deck you present plus a file you hand over. All three come from the one sentence this whole course rests on, write the input precise enough for a machine and demand the right rich format back out for a human, and all three end somewhere you can send to someone else.
🛟 If you get stuck
"I got a description of the page instead of the page." Say: "Build it as a single HTML artifact and show it to me." On ChatGPT or Gemini, say "Canvas" instead of "artifact."
"The download isn't a single file, or Netlify won't take it." Ask: "Give me this as one self-contained .html file with everything inline, no separate CSS or JS files." Then rename it index.html and drag that one file in.
"The page looks generic." Your spec was thin. Go back and add the specifics only you know, the real menu, the real hours, the audience, then rebuild. A page is only as good as the spec under it.
"It worked in the chat but breaks once published." Almost always a missing file. Re-ask for "one self-contained .html file with the CSS and JavaScript inline," re-download, and re-drag.
Frequently Asked Questions
Do I need to memorize more Markdown than what this course taught?
No. Headings, lists, triple-backtick fences, links, and images are all you need for everyday work. You have already seen tables by example. Anything fancier, just ask the AI to write it for you.
Should I learn to write HTML by hand?
Not for this workflow. The skill this course teaches is how to ask for HTML and how to judge what comes back, not how to type the tags yourself. Later in the book, a chapter covers web fundamentals properly, and at that point you will learn to read HTML when checking the AI's work. But you do not need that now.
Does asking for HTML waste my usage budget?
HTML output does use more of your usage budget than plain text. For short answers (a quick lookup, a one-line reply), it is not worth it. But for anything long, visual, or something you will share as a link, HTML is the right choice. The real waste is producing a long answer nobody reads because it was a wall of plain text.
What about PDFs, Word docs, slides, and spreadsheets?
The AI can produce all of them. Concept 13 has the full answer with ready-to-paste prompts for each format. The short version: pick the format by what the person will do with the file. Need them to sign it? PDF. Edit it? Word. Present it? Slides. Work with numbers? Excel. Feed it to another tool? CSV. You still write your content once in plain text and export to whatever the recipient needs.
What about code? Is that an output format too?
Not in the way this course means. Markdown, HTML, PDF, and the rest are containers you choose based on who will read them. Code is not a container; it is the thing you are building. A Python script and an HTML report are not two versions of the same answer; they are different things entirely.
That said, code still connects to what you learned here in two ways. First, when you include a piece of code in a spec, you wrap it in backtick fences so the AI treats it as data ( Concept 5 ). Second, you can ask the AI to explain code in a designed HTML page with annotations and diagrams ( Pattern 3 ). When the goal is to actually build software, that is the Agentic Coding Crash Course .
Is there a tool that does this Markdown-in/HTML-out pattern automatically?
Yes, and it is worth trying after you can do it from scratch, not instead of it. The skill this course builds is briefing and judging output yourself. Once you have that skill, tools speed you up. Without it, tools do your thinking for you.
With that said: an open-source project called HTML Anything does exactly this. It runs on your computer, works with AI tools you already have (Claude Code, OpenCode, Gemini, and others), and turns notes, Markdown, or a CSV into a finished HTML page across ready-made templates: slide decks, posters, data reports, social media cards. It is a good power tool to graduate into once you are comfortable with the manual version.
Where does this course lead?
Three places:
Spec-driven development (Part 1 of the book) builds on the spec skeleton you learned in Concept 7 .
The Agentic Coding Crash Course builds on the HTML output and verification habits from this course.
The Problem-Solving Crash Course assumes you can work in chat, terminal, and desktop (the three motions from Concept 14 ).
You can now say precisely what you mean, and ask for output worth reading. The appendix below puts the whole process in one place if you want to see it end to end. The next question is what to point this skill at , and that is where How to Think in the AI Era and the Problem-Solving Crash Course pick up.
Appendix: One spec, the HTML it became
The two-minute proof at the top conjured a page from one casual paragraph. This appendix is the grown-up version of the same motion: the real spec from Concept 1, and the actual page it produced. Read the spec. Do not read the HTML line by line ; the point of this section is that long HTML is for the browser, not the eye. The contrast between the two blocks below is the lesson.
The input: a Markdown spec
Al-Noor Tuition Academy Landing Page Spec
Goal
A one-page site parents open on their phones to check courses,
timings, fees, and how to reach us.
Requirements
-
Mobile-first; most visitors are on phones
-
Course table: course, days, time, monthly fee
-
Contact: tappable phone, WhatsApp link, location
-
Eid holiday banner at the very top
Hard constraints
-
Single self-contained HTML file, no external fonts or libraries
-
Must stay light enough to open on slow mobile data
-
Open Graph tags so the WhatsApp/Facebook link preview looks designed
Out of scope
-
Online payments
-
Student login
The output: the HTML it produced
This file is about 6 KB, loads with zero network requests after the page itself, reads cleanly on a phone, and carries the Open Graph tags that shape its link preview when shared. Every one of those properties was a line in the spec above; the spec is why the output is good, not luck. (One honest gap: a preview image needs og:image pointing at a hosted picture, which a single self-contained file does not have until you publish it somewhere. Add the tag once the page has a home.)
The block below is long on purpose, and you are meant to scroll past it . That scroll is itself the lesson: it is the same reason you would not read a long file in a chat window. The reading happens in the browser, not here.
<! DOCTYPE html >
< html lang = " en " >
< head >
< meta charset = " utf-8 " />
< meta name = " viewport " content = " width=device-width, initial-scale=1 " />
< title > Al-Noor Tuition Academy </ title >
<!-- Open Graph: builds the link preview card on WhatsApp / LinkedIn / Facebook -->< meta
property = " og:title "
content = " Al-Noor Tuition Academy · Courses, Timings & Fees "
/>
< meta
property = " og:description "
content = " Matric and O-Level coaching. See current courses, class timings, monthly fees, and how to reach us. "
/>
< meta property = " og:type " content = " website " />
< style >
:root {
--ink : #27313b ;
--muted : #5c6b78 ;
--paper : #fbf7f1 ;
--card : #ffffff ;
--line : #e7ded2 ;
--accent : #c1633a ;
--accent-soft : #f4e4d8 ;
}
- {
box-sizing : border-box ;
}
body {
margin : 0 ;
background : var ( --paper ) ;
color : var ( --ink ) ;
font-family :
-apple-system , BlinkMacSystemFont , "Segoe UI" , Roboto , sans-serif ;
line-height : 1.5 ;
-webkit-text-size-adjust : 100 % ;
}
.wrap {
max-width : 680 px ;
margin : 0 auto ;
padding : 0 18 px 48 px ;
}
.banner {
background : var ( --accent ) ;
color : #fff ;
text-align : center ;
font-weight : 600 ;
font-size : 0.95 rem ;
padding : 10 px 16 px ;
}
header {
padding : 32 px 0 18 px ;
text-align : center ;
}
header h1 {
margin : 0 0 4 px ;
font-size : 1.7 rem ;
letter-spacing : -0.01 em ;
}
header p {
margin : 0 ;
color : var ( --muted ) ;
font-size : 1 rem ;
}
h2 {
font-size : 1.05 rem ;
text-transform : uppercase ;
letter-spacing : 0.06 em ;
color : var ( --accent ) ;
margin : 34 px 0 12 px ;
}
table {
width : 100 % ;
border-collapse : collapse ;
background : var ( --card ) ;
border : 1 px solid var ( --line ) ;
border-radius : 12 px ;
overflow : hidden ;
}
th ,
td {
text-align : left ;
padding : 12 px 14 px ;
font-size : 0.95 rem ;
}
thead th {
background : var ( --accent-soft ) ;
color : var ( --ink ) ;
font-size : 0.8 rem ;
text-transform : uppercase ;
letter-spacing : 0.05 em ;
}
tbody tr + tr td {
border-top : 1 px solid var ( --line ) ;
}
td .fee {
font-weight : 600 ;
white-space : nowrap ;
}
.contact {
display : grid ;
gap : 10 px ;
margin-top : 6 px ;
}
.contact a {
display : flex ;
align-items : center ;
gap : 12 px ;
text-decoration : none ;
background : var ( --card ) ;
border : 1 px solid var ( --line ) ;
border-radius : 12 px ;
padding : 14 px 16 px ;
color : var ( --ink ) ;
font-weight : 500 ;
}
.contact a :active {
background : var ( --accent-soft ) ;
}
.contact svg {
flex : 0 0 22 px ;
}
footer {
margin-top : 36 px ;
text-align : center ;
color : var ( --muted ) ;
font-size : 0.85 rem ;
}
@media ( min-width : 560 px ) {
header h1 {
font-size : 2 rem ;
}
}
</ style >
</ head >
< body >
< div class = " banner " >
Eid holidays: the academy is closed 6–9 June. Classes resume 10 June.
</ div >
< div class = " wrap " >
< header >
< h1 > Al-Noor Tuition Academy </ h1 >
< p > Matric & O-Level coaching · Gulberg, Lahore </ p >
</ header >
< h2 > Courses & Timings </ h2 >
< table >
< thead >
< tr >
< th > Course </ th >
< th > Days </ th >
< th > Time </ th >
< th > Fee / month </ th >
</ tr >
</ thead >
< tbody >
< tr >
< td > Matric Mathematics </ td >
< td > Mon–Wed </ td >
< td > 4:00–5:30 pm </ td >
< td class = " fee " > PKR 3,500 </ td >
</ tr >
< tr >
< td > Matric Physics </ td >
< td > Tue–Thu </ td >
< td > 5:30–7:00 pm </ td >
< td class = " fee " > PKR 3,500 </ td >
</ tr >
< tr >
< td > O-Level Chemistry </ td >
< td > Mon–Wed </ td >
< td > 6:00–7:30 pm </ td >
< td class = " fee " > PKR 4,000 </ td >
</ tr >
< tr >
< td > O-Level English </ td >
< td > Fri–Sat </ td >
< td > 10:00–11:30 am </ td >
< td class = " fee " > PKR 4,000 </ td >
</ tr >
</ tbody >
</ table >
< h2 > Reach Us </ h2 >
< div class = " contact " >
< a href = " tel:+923001234567 " >
< svg
viewBox = " 0 0 24 24 "
fill = " none "
stroke = " #c1633a "
stroke-width = " 2 "
stroke-linecap = " round "
< path
d = " M22 16.9v3a2 2 0 0 1-2.2 2 19.8 19.8 0 0 1-8.6-3.1 19.5 19.5 0 0 1-6-6 19.8 19.8 0 0 1-3.1-8.6A2 2 0 0 1 4.1 2h3a2 2 0 0 1 2 1.7c.1.9.4 1.8.7 2.7a2 2 0 0 1-.5 2.1L8.1 9.9a16 16 0 0 0 6 6l1.4-1.2a2 2 0 0 1 2.1-.5c.9.3 1.8.6 2.7.7a2 2 0 0 1 1.7 2z "
/>
</ svg >
Call: 0300 123 4567
</ a >
< a href = " https://wa.me/923001234567 " >
< svg viewBox = " 0 0 24 24 " fill = " #c1633a " >
< path
d = " M12 2a10 10 0 0 0-8.6 15l-1.3 4.7 4.8-1.3A10 10 0 1 0 12 2zm0 18a8 8 0 0 1-4.1-1.1l-.3-.2-2.8.7.8-2.8-.2-.3A8 8 0 1 1 12 20zm4.5-5.9c-.2-.1-1.4-.7-1.6-.8s-.4-.1-.6.1-.6.8-.8 1-.3.2-.5.1a6.5 6.5 0 0 1-3.2-2.8c-.2-.4.2-.4.6-1.2a.5.5 0 0 0 0-.5l-.8-1.9c-.2-.5-.4-.4-.6-.4h-.5a1 1 0 0 0-.7.3 3 3 0 0 0-.9 2.2c0 1.3 1 2.6 1.1 2.8s1.9 2.9 4.6 4a5 5 0 0 0 2.3.5c.7-.1 1.4-.6 1.6-1.1s.2-1 .1-1.1z "
/>
</ svg >
WhatsApp: 0300 123 4567
</ a >
< a href = " https://maps.google.com/?q=Gulberg+Lahore " >
< svg
viewBox = " 0 0 24 24 "
fill = " none "
stroke = " #c1633a "
stroke-width = " 2 "
stroke-linecap = " round "
< path d = " M21 10c0 6-9 12-9 12s-9-6-9-12a9 9 0 0 1 18 0z " />
< circle cx = " 12 " cy = " 10 " r = " 3 " />
</ svg >
Main Boulevard, Gulberg (view on map)
</ a >
</ div >
< footer > Open for admissions · New batches every month </ footer >
</ div >
</ body >
</ html >
Now do the three things the course taught
Open it. The fastest way, no computer needed: paste the whole HTML block into Claude.ai and say "turn this exact HTML into an artifact; change nothing," then publish it and open the link on your phone. (On a computer, you can instead save the block as tuition.html and double-click it.) Notice you read it; you did not skim it. That is Concept 8.
Change it by prompting, not typing. Tell your agent: "Add a fifth course row for FSc Biology, Sat–Sun 2 :00 –3 :30 pm, PKR 4,500, and make the holiday banner dismissible." You never touched a tag. That is Concept 9.
Publish it. Push it through any rung of the publishing ladder (Concept 12), then share the link in WhatsApp and watch the preview card render. That is Concepts 11 and 12 closing the loop.
That is the entire crash course in one artifact: a precise Markdown spec went in, readable HTML came out, you edited it by prompting, and you shipped it.
Flashcards Study Aid
Test Your Understanding
Checking access...
Previous
AI Prompting in 2026
Next
Code You Never Write
Prove it in two minutes
📚 Teaching Aid
Part 1: The two languages
-
Why agents need structure
-
The asymmetry: Markdown in, HTML out
Part 2: Markdown, the writing language
-
Headings: tell the AI what matters most
-
Lists: bullets for sets, numbers for sequences
-
Code blocks: showing the AI exactly what you mean
-
Links and images: pointing at the world
-
Your first complete specification
Part 3: HTML, the reading language
-
Why ask for HTML at all
-
You don't write HTML; you prompt for it
-
The five HTML patterns
-
When the destination is a feed, not a browser
-
Publishing: from artifact to link
-
When the destination is a document, not a browser
Part 4: One exercise, three motions
- The three motions
A short recap before you try the prompts
Try this now: seven prompts
🚀 Projects
Frequently Asked Questions
Appendix: One spec, the HTML it became
The input: a Markdown spec
The output: the HTML it produced
Now do the three things the course taught
Flashcards Study Aid
Test Your Understanding
Agentic Engineer
Learn
Start Reading Curriculum Factory Dashboard Authors
Company
About Us Our Mission Contact Privacy
Komyosys